

A couple of years ago my department and I began focusing in on developing disciplinary literacy. (For the record, I really like the definition of this given by Shanahan & Shanahan (2012) as “the specifics of reading, writing, and communicating in a discipline”.) In other words, getting our students to read, write and communicate (i.e. speak) like young scientists! We started out with something relatively simple which we felt could have high impact – the use of Frayer Models to develop tier 2 and tier 3 vocabulary. (You can read about our work on this here.) In the past 18 months we have evolved our work to develop both reading and extended writing in Science. I hope to post about our approaches to both, starting here with extended writing. (Fingers crossed there isn’t a 2 year wait between blog posts this time!)
The Task – Year 8 Separating Techniques.
Each half term we ask our pupils to do a piece of extended writing. In the past this was a response to a 6-mark question inspired by GCSE assessment, however, we felt that this approach limited what we could get the pupils writing about and how much they would write! So we have begun moving towards more open ended tasks. The example I share here is from Y8, which was originally posed as a 6-mark question in previous years. This year it was opened up to allow the pupils more freedom to write extensively. The task I set them was, To describe the steps needed to separate salt from rock salt. This was actually later extended to “explain” the steps due to the ease at which they approached it! (This is the beauty of not using 6-mark questions, you can adapt the task as required / as it evolves – responsive teaching!) Next I will describe the approach I took and how it unfolded across 3 lessons.
The Planning Phase.
The practical itself is one most secondary science teachers will be familiar with. It requires the pupils to extract sodium chloride (table salt) from a rock salt mixture, using several techniques taught to them during the course of the unit including: filtration, evaporation, and crystallisation. (For tips on effective practical work you can read my post for PMT Education here.) During the practical the pupils have a simple 2×2 grid in their books in which they use to make brief notes on each of the steps for the practical. The pupils are shown how to construct this grid with four headings (grinding, dissolving, filtering, and evaporating) over the visualizer. The pupils knew, before starting the practical, that I would be asking them to write extensively about it in a later lesson and that I was going to mark / feed back to them. Front loading the task in this manner was deliberate, to try and build in as much motivation as possible for them to record detailed notes (and they did!)
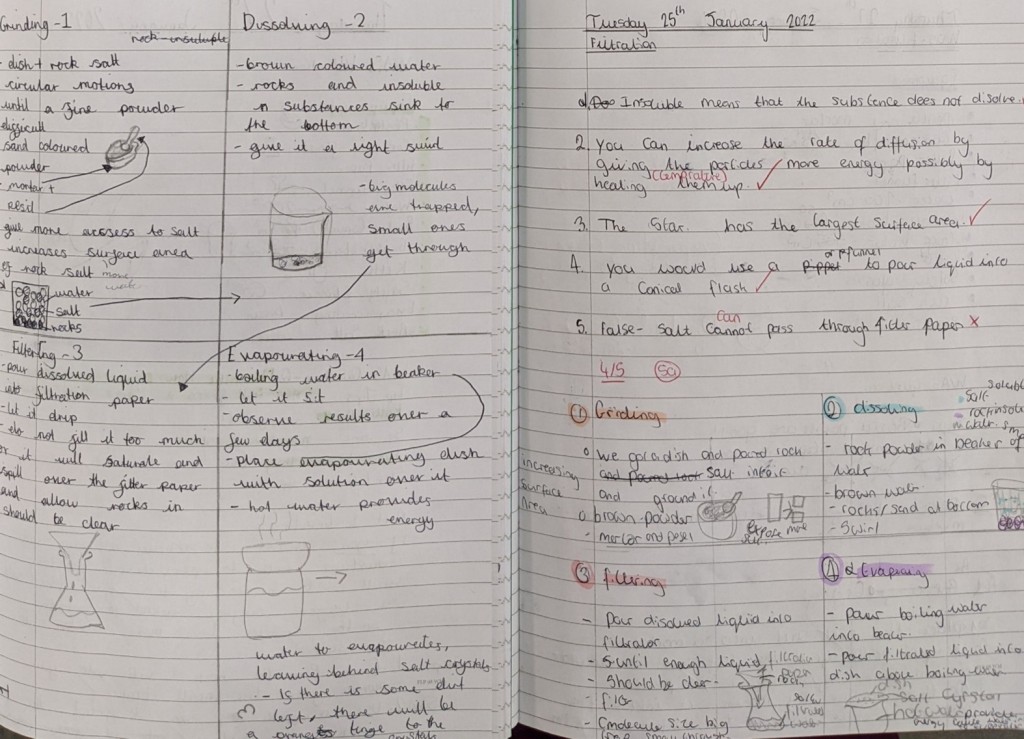
At the end of the practical we went through the planning grid via the visualizer to discuss the main steps and check for any misconceptions. This was a great opportunity for cold-calling on particle theory, names of equipment, and procedural issues such as “why did we?” It is worth noting here that this was the end of the first 1 hour lesson.
Setting the Task.
“Ok kids, now write about your practical, off you go!”
Not quite!
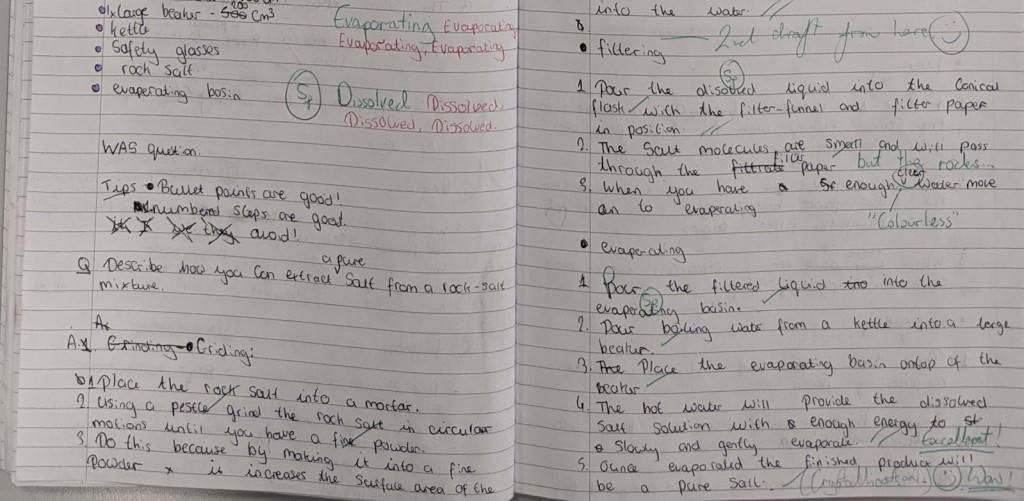
At the start of the second lesson in this sequence I reminded the pupils of our original task, To describe the steps needed to separate salt from rock salt. I then took some time to share some of the better planning grids from the previous lesson via the visualiser. (To improve retrieval from the previous lesson – not all retrieval practice is quiz questions after all!) The next step is critical in terms of developing disciplinary literacy. I have absolutely no issue with pupil writing in bulky paragraphs and continuous prose, however, I want to see more precise scientific writing, bullet points, lists, etc. So I take the opportunity to give the following writing guidelines to the pupils:
– try using bullet points or numbered steps
– avoid using “I”, “we”, “they”, “you” etc.
I then gave the pupils roughly 15 minutes writing time. Those who finished within this time could go on Tassomai and complete some retrieval practice whilst others finished.
Before I go further, since conducting this work with Y8, I have included an extra step here which is rather simple. I now give the pupils the following reminder,
Now that you have finished written work, can you now please take a few minutes to proof read your work. Please check your spellings against your key words in your plan from last lesson, and make sure you have not omitted any capital letters, full stops or other important punctuation!
This step should massively reduce the time I waste trying to pick out silly mistakes and allow me to focus on feeding back on developing scientific writing. (Most pupils know how to use a capital letter, they are just children making silly mistakes sometimes!) I then collect the books in.
Pro tip – when collecting the books in for marking, I asked the pupils to stack them, open on the page they completed the task, so I could save time having to look for them! 😉
Marking.
Anyone who knows me will know my views on marking and may be surprised to see me discussing it here! Let me be clear, this is the only task my staff are expected to hand mark in books (once per half term) as part of a blended approach to feedback in my department. This provides us with an opportunity to look more closely at our pupils’ books and quality of writing, without it becoming onerous and a huge time sink.
When marking I am mainly looking at the work from 2 perspectives:
1 – Marking for literacy – spellings, punctuation, writing style, etc. We do have whole school marking codes to use as required here, but the approach is very relaxed and teachers are encouraged to use them as they deem appropriate.
2 – Marking for scientific accuracy – names of apparatus, correct steps taken, correct science in both description and explanation.
Please note the images I share here have more annotations on them than I would like. I am hoping that improved proof-reading as discussed earlier will reduce the need for “Sp” and “Cp” (spelling and capital letter codes) on much of the work in future!
Whilst marking I have a note pad next to me to record the main themes to be shared via whole-class feedback. This approach saves me having to write out the same feedback in books 30 times – what a waste of time that would be!
Feedback and redrafting.
Depending on the number and significance of these themes I may choose to print a copy of the whole class feedback notes for the pupils to stick to in their books for reference. In this instance this is exactly what I decided to do. In the following lesson I then ask them to read my feedback / marking silently whilst I take the register. They also read their own work again fully.

I chose 3 excellent first drafts from the group and read them out loud to the class. In each instance I have the work under the visualizer so the pupils could see the style of writing, presentation of work (use of bullet points etc.) and correct spellings of key terms. Feedback is pretty pointless unless the pupils have an opportunity to act upon it (EEF 2018). This can be something quick or more extensive. Here I chose the latter and determined that the pupils would completed a full redraft of their work based upon:
1 – The individual marking / codes on their work.
2 – The whole class feedback given to them (shown above).
3 – Hearing and seeing 3 great examples from the group.
Redrafting then takes place during a 15-minute window with pupils moving on to Tassomai if they finish early. I circulate the room to give more specific feedback and support as needed.

Closing thoughts.
+ The pupils had an extended opportunity to focus on both what they write and how they write it.
+ Each pupil had personalised feedback that was relatively immediate (following lesson) and that they could act upon.
+ The development of disciplinary literacy seems to have had a sustained impact in the pupils work during follow up tasks in lesson.
+ The visualizer allowed me to show the pupils what a good one looks like!
– The whole process had a significant time cost (1 full lesson plus 2 half lessons, one for first draft, one for feedback and second draft)
– There is still an argument that marking a sample of 6 books rather than all 30 would have given me the information I need to inform whole class feedback.
My department and I are now looking at how we can further develop the disciplinary literacy of our students. I’d be really keen to hear approaches from other schools, so feel free to comment below or to chat to me further over on twitter.
Thanks for dropping by.
Dave
References:
Teaching and Learning Toolkit, EEF (2018) Available online at, https://educationendowmentfoundation.org.uk/pdf/generate/u=https://educationendowmentfoundation.org.uk/pdf/toolkit/?id=131&t=Teaching%20and%20Learning%20Toolkit&e=131&s=
(Accessed 14th April 2022)
Shanahan, T., & Shanahan, C. (2012). What is disciplinary literacy and why does it matter? Topics in Language Disorders, 32(1), 7–18.
